
How to Create an EFT File With Amputated or Missing Fingers
What to write on an FD-258 card with an amputated finger, and how to declare missing fingers in SLAP & ROLL so the ATF eForms portal accepts your EFT file.
A fingerprint card missing a finger will never show all 20 impressions. It does not need to. When the person being fingerprinted has an amputated finger, you mark it on the card and declare it in SLAP & ROLL before creating the EFT. This guide covers both.
Marking an amputated finger on the FD-258 card
Write AMP in the block for each finger the person does not have. The notation tells anyone reading the card why the block is empty.
For rolling technique on the fingers the person does have, see How to roll your own fingerprints on an FD-258 card.
Why the EFT needs the declaration
The ATF eForms portal checks the EFT file when you upload it. A file with a missing finger that is not declared is rejected with the error "Fingerprint cards cannot be validated."
The AMP on the paper card does not reach the portal. Only the EFT does. When you declare the missing fingers, SLAP & ROLL records them in the file in the form the FBI expects, so eForms can accept it.
Creating the EFT in SLAP & ROLL
A full FD-258 card carries 20 impressions: 10 rolled prints and 10 flat prints. Each missing finger removes one of each, so a card with one amputated finger shows 18 of 20.
Upload the card
Scan and upload the card exactly as you would any other. The settings do not change: 600 DPI, grayscale, PNG or TIFF. For the full upload walkthrough, see How to convert an FD-258 fingerprint card to an EFT file at home.
Review the blocked result
If fewer than 20 prints are found, the result panel shows CANNOT CREATE EFT with the count, for example "Only 18 of 20 fingerprints were detected on your card." Below it are two buttons: UPLOAD NEW CARD and DECLARE AMPUTATED FINGERS.
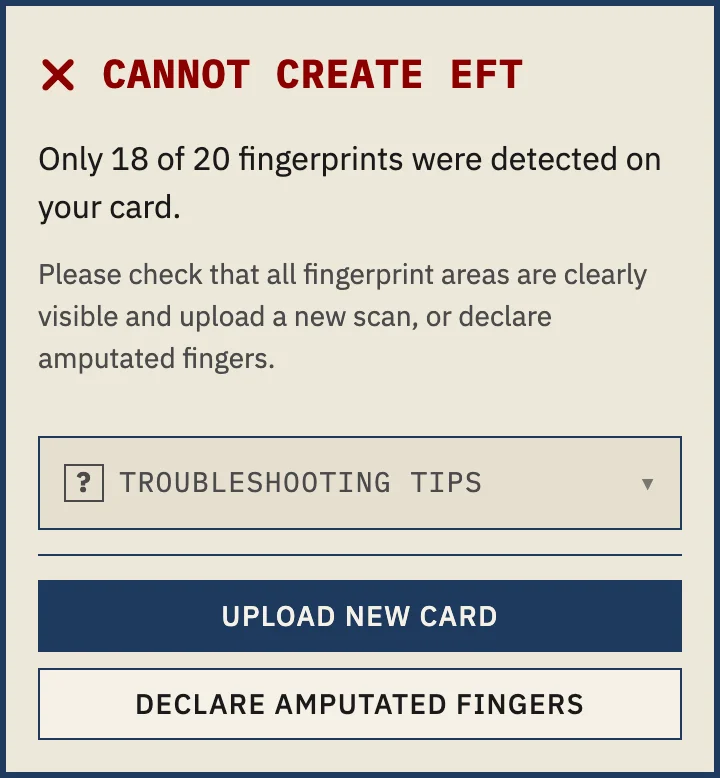
If the person has every finger, use UPLOAD NEW CARD instead. The count is short because of the scan or the ink, not the hand.
Select the missing fingers
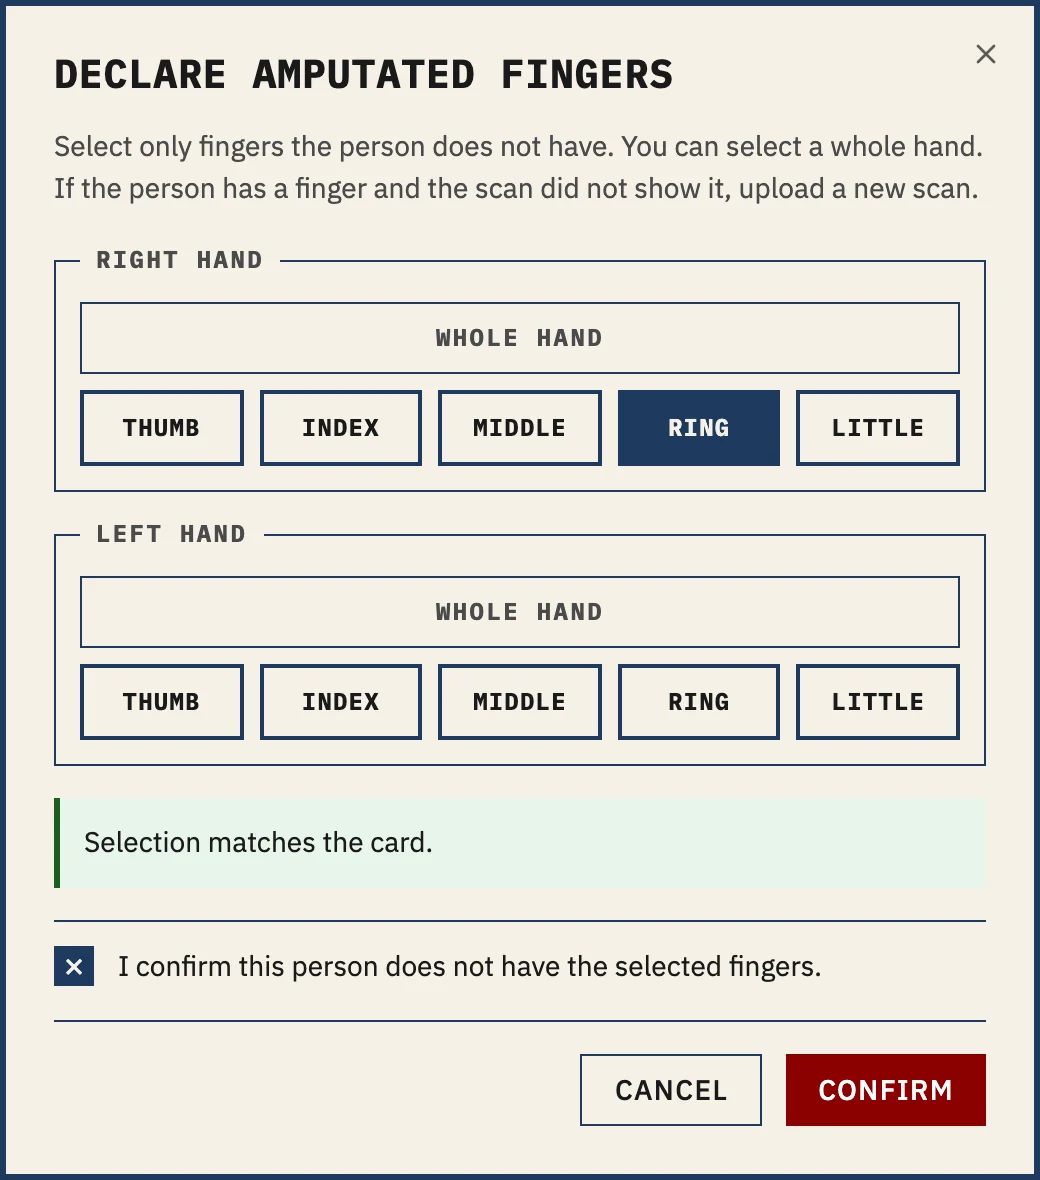
Click DECLARE AMPUTATED FINGERS. The dialog shows a RIGHT HAND and a LEFT HAND group, each with THUMB, INDEX, MIDDLE, RING, and LITTLE. Select each finger the person does not have. To select all five fingers of one hand, click WHOLE HAND.
The dialog opens with this instruction:
Select only fingers the person does not have. You can select a whole hand. If the person has a finger and the scan did not show it, upload a new scan.
When your selection lines up with the empty slots on the card, the dialog shows "Selection matches the card."
Confirm the declaration
Check I confirm this person does not have the selected fingers. The CONFIRM button stays disabled until the box is checked. Click CONFIRM.
Wait for relabeling
The panel shows RELABELING FINGERPRINTS. SLAP & ROLL assigns the detected prints to finger positions again, this time without the fingers you declared.
Check the ready result
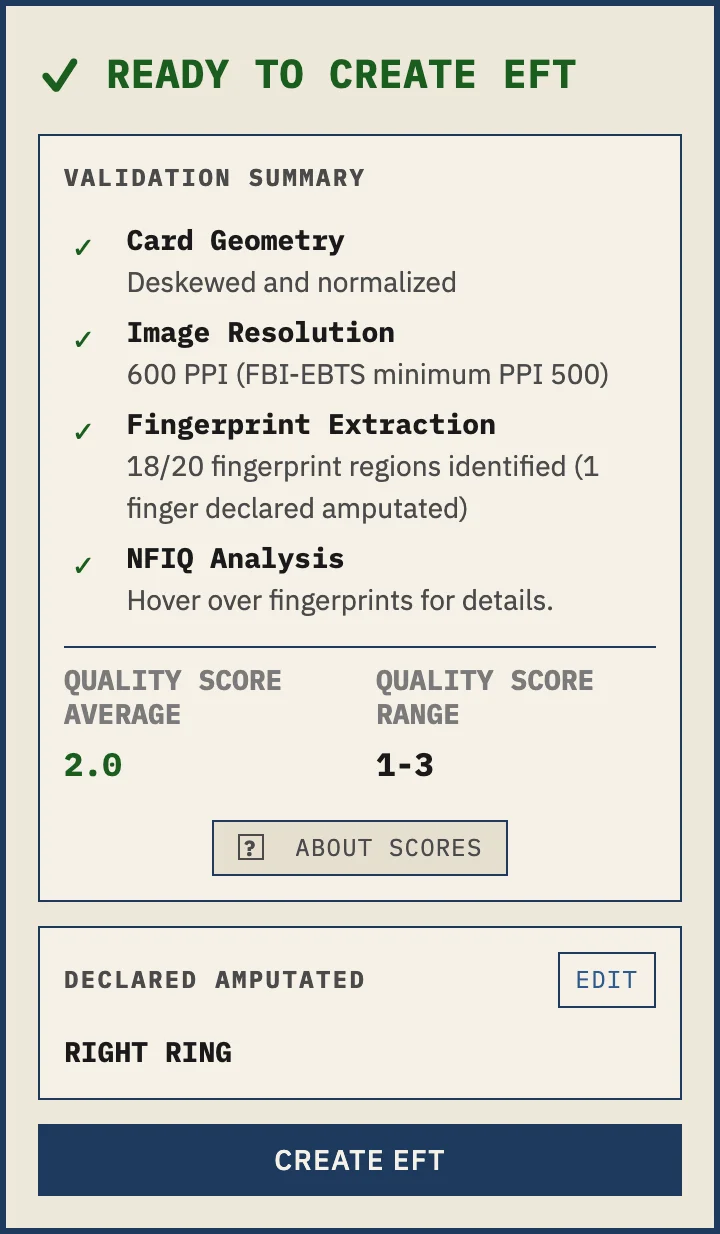
If the remaining prints now account for every finger, the panel shows READY TO CREATE EFT. The validation summary reads, for example, "18/20 fingerprint regions identified (1 finger declared amputated)", and a DECLARED AMPUTATED block lists each finger you declared. Use EDIT in that block to change the declaration.
Create the EFT
Click CREATE EFT and continue as normal: payment, the Privacy Vault, and download.
A missed print is not an amputation
The declaration is a statement about the person's hand, not about the scan. Only declare fingers the person does not have. If the scan missed a finger, re-scan the card. If the print is too faint to detect, re-roll it.
SLAP & ROLL checks the declaration against the card after relabeling. If the declared fingers and the detected prints still do not line up, the card stays blocked with "The card still does not match the declared fingers. Upload a new scan or contact support." The second button then reads EDIT DECLARATION. Fix the selection there if it was wrong. If the card and the declaration are both correct, contact support.
What is supported
- One finger or several. Any combination of fingers across both hands, including both thumbs.
- A whole hand. One click on WHOLE HAND selects all five fingers. A card with one hand missing shows 10 of 20 impressions.
- Both output formats. The older Type-4 format and the newer Type-14 format both carry the declaration.
Common questions
Do I need to write anything on the card?
Yes. Write AMP in the block for each finger the person does not have. SLAP & ROLL reads the prints, not the handwriting, so you also declare the missing fingers in the app.
What if the scan missed a finger the person has?
Do not declare it. Re-scan the card, or re-roll the finger if the print is too faint to detect.
Does this work for a whole missing hand?
Yes. The declaration dialog has a WHOLE HAND button for each hand that selects all five fingers at once. A card with one hand missing shows 10 of 20 impressions.